How do I enable Contact Permissions for my release?
Caster allows you to add a contact to your releases so that your recipients can contact you directly. Please follow the steps on how to enable this:
1) Log into Caster - https://caster.plaympe.com
2) Click the 3 dots next to the release you want to add a contact.
3) Select Contact Permissions

4) Enable Contact and enter the email address of the person who will be receiving messages from recipients.
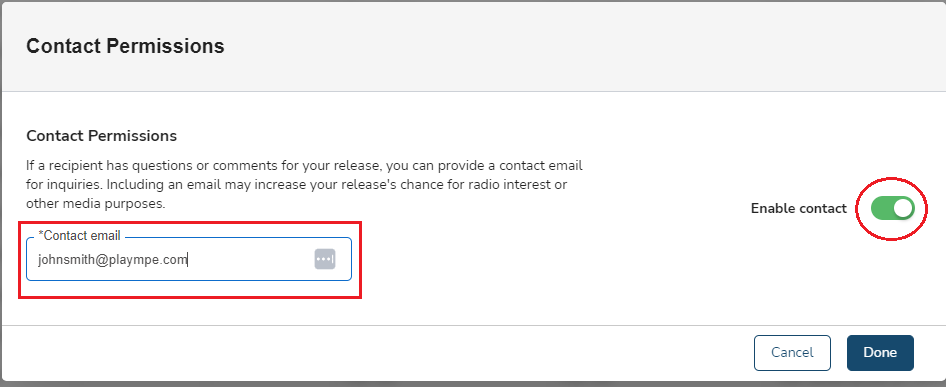
5) Select Done.
6) Your recipients can now contact you using the contact icon in the player.
Related Articles
Enabling "Share a Release" Permissions
Recipients from your chosen lists can now share your releases with their own Player Network Connections and coworkers with the click of button! To enable this feature for your release, toggle ON “Allow Sharing?” in Step 3 of the submission process in ...Composing & Editing Release Emails
With Caster, you can design and compose content for release emails using the Email Builder in Step 3. Upload album images, attachments, write, copy and paste text, links, and images, and assemble the layout. Then preview to select email addresses to ...Setting a Release Expiry Time
Optionally, you can set an expiry date/time for a release so that it is made unavailable in the system on a certain date and time. Setting a release expiry Edit an existing release where you wish to set an expiry. Go to Contacts (Step 4) Create or ...Creating a Release (Text Instructions)
Creating a Release in 4 Steps with Full-service Caster Introduction Creating a Release with Caster is a 4-step process and is the foundation for getting your music out to verified tastemakers around the world! With the Release Creator, you’ll be able ...Setting Release Email Send Time
If your release has an email notification you can set the email send time in its Schedule. Setting release email send time Edit an existing release. Go to contacts (Step 4) Create or edit a Schedule. The create schedule page will open. Look for ...